Ever wondered what’s actually in your food? Food testing is your scientific gateway to understanding nutrition at the molecular level. These laboratory procedures reveal the presence or absence of key nutrients using simple chemical reactions that produce dramatic color changes.
What You Need to Know
Food tests are laboratory procedures that detect specific nutrients in food samples using special chemicals called reagents – think iodine solution, Benedict’s solution, and Biuret solution as your detective tools.
Pro Tip: Always prepare solid foods by crushing them and adding a little water to create a food solution before testing.
🍯 Testing for Reducing Sugars (Benedict’s Test)
Reducing sugars like glucose and maltose literally “reduce” Benedict’s solution by removing oxygen during the reaction.
What You’ll Need:
- Food solution
- Benedict’s solution
- Test tube
- Water bath (80°C)
Step-by-Step:
- Prepare your food solution
- Add 2cm³ of Benedict’s solution to 1cm³ of food solution in a test tube
- Heat gently in water bath at 80°C for 5 minutes
- Watch the magic happen!
Results:
- ✅ Brick-red color = Reducing sugars present
- ❌ Blue color = No reducing sugars
🧪 Testing for Non-Reducing Sugars
Non-reducing sugars like sucrose and lactose need a little extra chemistry to reveal themselves.
The Process:
- Start with your food solution containing non-reducing sugar
- Add a few drops of dilute hydrochloric acid
- Gently boil for 3-5 minutes (watch for fizzing from CO₂ production!)
- Cool, then neutralize with sodium hydroxide drops
- Add 2cm³ Benedict’s solution and shake
- Heat in water bath for 5 minutes
Results:
- ✅ Brick-red color = Non-reducing sugars present
- ❌ Blue color = None detected
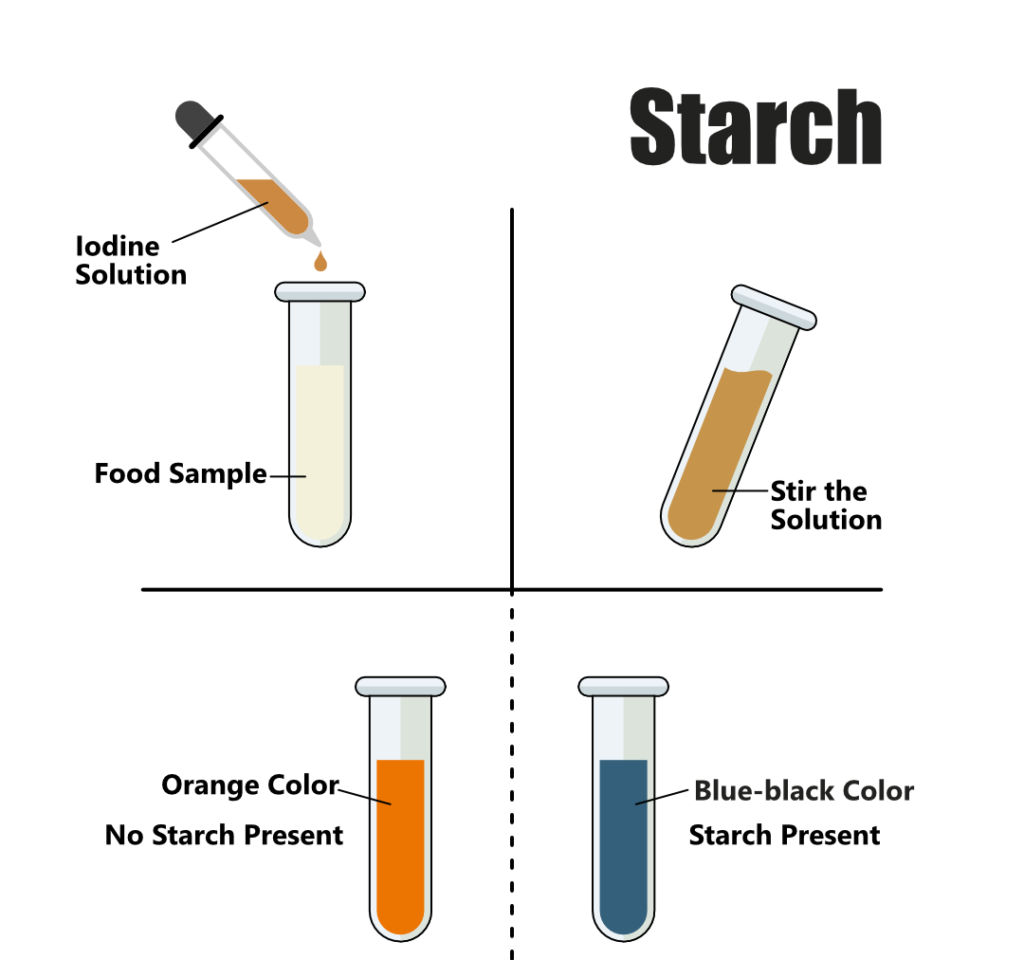
🍞 Starch Detection (Iodine Test)
The simplest test of all – just three quick steps!
Super Simple Method:
- Get your food solution in a test tube
- Add a few drops of iodine solution
- Observe the instant reaction
Results:
- ✅ Blue-black color = Starch confirmed
- ❌ Orange-brown color = No starch
🥩 Protein Testing (Biuret Test)
Two methods, same reliable results for detecting proteins.
Method 1 – Quick Version:
- Take 2cm³ of food solution
- Add 4-5 drops of Biuret solution and shake
- Check color change
Method 2 – DIY Version:
- Start with 2cm³ food solution
- Add 1cm³ sodium hydroxide
- Add 1% copper sulfate solution drop by drop
Results for Both Methods:
- ✅ Purple/violet color = Proteins detected
- ❌ Blue color = No proteins
🧈 Fat & Oil Detection (Lipid Tests)
Choose your preferred method for detecting fats and oils.
Method 1 – Spot Test (Super Easy):
- Drop food solution on filter paper OR rub solid food on paper
- Let it dry completely
- Examine the paper
Results:
- ✅ Translucent greasy mark = Fats/oils present
Method 2 – Emulsion Test:
- Mix food solution with ethanol in test tube and shake well
- Pour water into a clean test tube
- Add some of your food mixture to the water
Results:
- ✅ Cloudy/milky water = Fats detected
- ❌ Clear water = No fats
Key Takeaways
These food tests transform invisible nutrients into visible results through simple color chemistry. Whether you’re a student, researcher, or curious cook, these procedures give you the power to analyze what’s really on your plate. Remember: preparation is key, safety first, and those color changes tell the whole story!
Ready to become a food detective? Grab your reagents and start testing!